Some Known Factual Statements About Tile Installation Contractors
Table of ContentsThe smart Trick of Tile Installation That Nobody is DiscussingThe Buzz on Tile InstallationExcitement About Tile ContractorsThe Ultimate Guide To Tile ContractorsNot known Facts About Tile InstallationTile Installer - The Facts
Mix grout according to package instructions. After the cement is all set, spread it in brushing up arcs with the rubber grout float held at a shallow angle. Apply at a 45-degree angle to the rooms in between floor tiles to stop the float from pressing into the spaces and also producing irregular grout surfaces.Concentrate on tiny 4-by-4-foot areas. After the grout is spread, get rid of the excess with a cement float held at a 45-degree angle. Work diagonally across the joints to avoid dipping right into the joints. Mist the cement two times a day for 3 days to slowly treat it. Do not walk over the surface area for 8 to 12 hrs.
Virtually all concrete grouts have latex polymer in the powder mix. Others need a latex polymer admixture. For joints 1/8-inch to 1/2-inch, utilize sanded grout. For joints up to 1/8-inch, make use of non-sanded cement. Follow the tile supplier's recommendations. If there are gaps in between the ceramic tile and the wall surface, make sure to fill up the space with caulk to keep water from obtaining under the ceramic tile or right into the wall.
7 Easy Facts About Tile Installer Explained
It also won't fracture as well as can be changed easily. While you can also fill up the gaps with mortar or grout, it is not as flexible, water-proof or easy to fix as caulk.
/cdn.vox-cdn.com/uploads/chorus_asset/file/19497064/howto_tile_12.jpg)
Beginning with checking out do it yourself blog posts (similar to this one) and enjoying useful You, Tube video clips, After that take it one action further and also check out the in-depth directions offered by the producer! Many people look over this simple step because the guidelines supplied by the manufacturer can in some cases be pretty tiring to read or make use of terminology that you're not knowledgeable about! You can relax simple knowing that you're obtaining expert recommendations.
The 15-Second Trick For Tile Installation
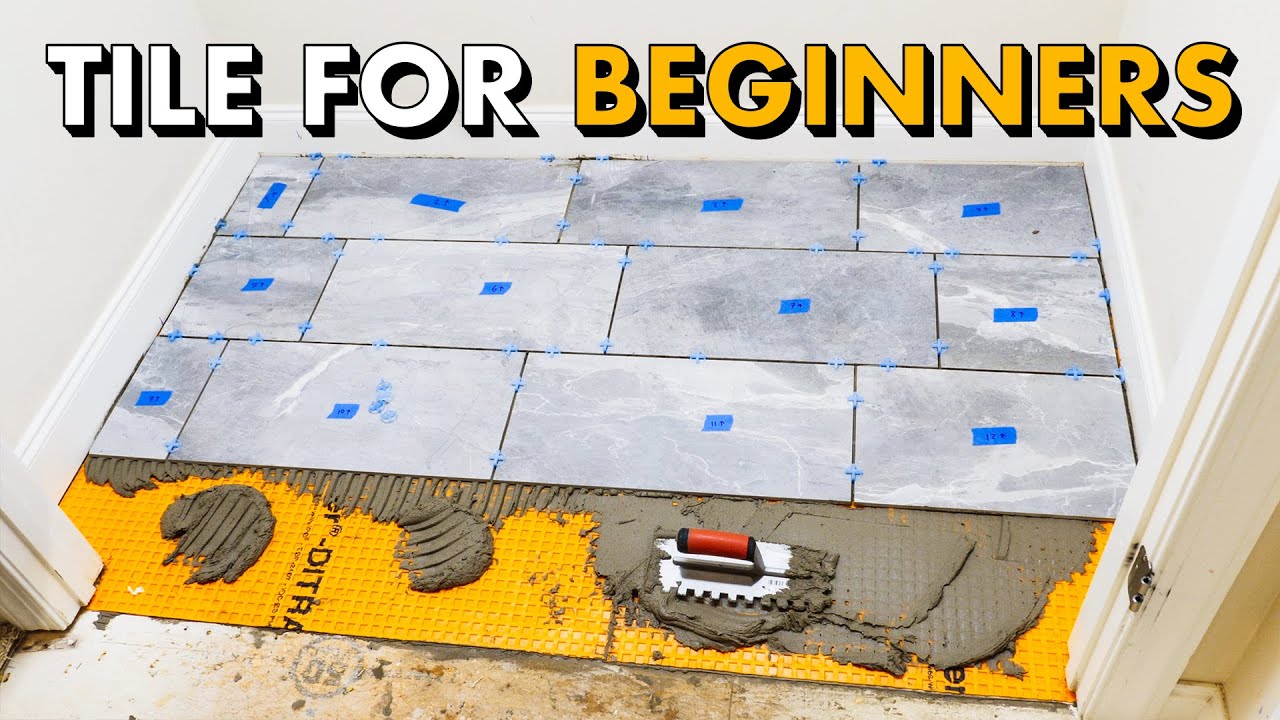
Given that showers go through a heap of water & there needs to be correct slopes for draining pipes, the procedure for shower pans (which is what shower floorings are called) is really VERY various. This tutorial is for restroom floors beyond the shower. This how to floor tile a washroom floor tutorial has affiliate links, however absolutely nothing that I wouldn't wholeheartedly suggest anyhow! Read my full disclosure below. Let's find out just how to floor tile a bathroom floor! Supplies for setting up bathroom flooring tiles: Step 1.
The bottom layer when laying restroom floor ceramic tiles is concrete backer. And if you're wondering NO you can not simply install the shower room ceramic tile floors on top of the plywood subfloors.
Tile Contractors - Questions
(See Step 6 below for additional information on just how to blend up your thin set). Safeguard the concrete backer boards with cement board screws screwed into the floor joists spaced concerning 6 inches and also drive them up until they are flush with the cement boards, but not countersunk. The joints of the backer board likewise need to be taped with mesh tape, yet we did this as we laid the tile later on in Action 7.
Line up ceramic tile positioning. Tile looks best with lengthy as well as straight runs.
Take that measurement and make marks on contrary sides of the lengthiest wall as well as break a chalk line. Repeat with a vertical wall so you make a cross on your floor with chalk lines. This will certainly be where you place your first floor tile to make certain every little thing else behaves and square.
Getting My Tile Installation To Work
Set out shower room flooring tiles. Lay out your washroom floor ceramic tiles along this line beginning at the cross you made with the chalk lines. Go from one end of the room to the various other. Make any changes based on possible website traffic on grout lines as well as to ensure you do not have tiny tiles cuts on either anonymous end.
This is called "completely dry installation". You will not have time to mortar, determine, and also reduced tiles to fit as you go alone, which can obtain a little stressful when you're going back as well as forth to the ceramic tile saw a million times as your mortar begins to establish up (tile installation). Do not neglect to use spacers when you are dry suitable the shower room flooring ceramic tiles.
Cut borders items with a floor tile saw. Cut any edge pieces you can try here as essential with a damp ceramic tile saw. You'll see right here that we are utilizing this tiny little ceramic tile saw and also we actually wound up not enjoying it! Review much more below concerning why we don't think you ought to use cheap tile saw similar to this and also why we obtained so annoyed. You 'd be better off renting a good tile saw for your project or investing in something that function much better if you're going to be tiling even more than 1 time.
Unknown Facts About Tile Contractors
Blend slim set mortar. Go to your pantry as well as draw out that jar of creamy peanut butter. Open the lid and take a good appearance. This is the uniformity your mortar must be when you go to lay your ceramic tile. Follow the directions on your mortar to get it mixed effectively.
Mortar dries pretty promptly so just lay enough for about 2-4 feet of one row at once. Gently set the flooring tile down on top of the mortar and with even pressure, push down the tile with an ever before so minor twist to exercise any air bubbles. When establishing your bathroom flooring tiles attempt to obtain them as near the various other ceramic tiles as possible, then add tile spacers and also change for a tight find out fit.
They help you area your tile out correctly as well as guarantee every little thing is level as well as flush. Tip 8.